
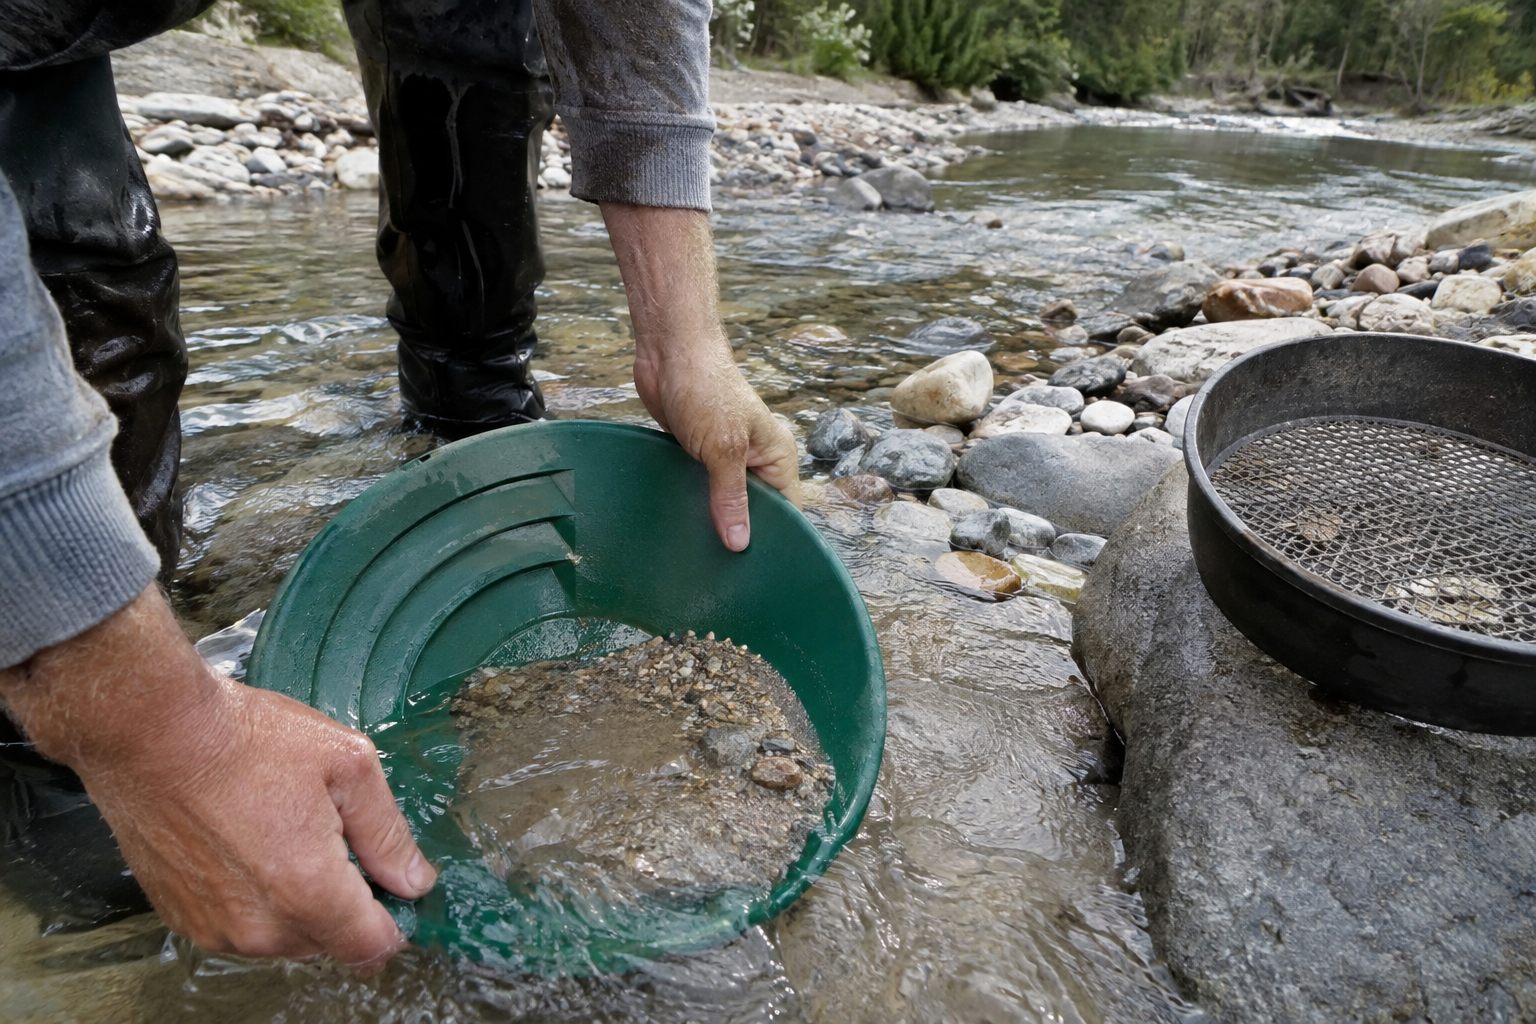
Panning for gold looks simple from a distance: swirl a pan of gravel in a stream and wait for a flash of color. The real skill is in what happens before that flash: how you load the pan, settle it, and wash it down without losing the gold already sitting at the bottom. Get those steps right and even a few hours on a public stream can turn up real color. Get them wrong, and you can wash gold straight over the edge of the pan without ever seeing it.
This guide walks through how to pan for gold, from researching a stream worth testing to separating gold from the black sand (the dark, heavy minerals that settle alongside gold) left in the bottom of your pan. If you still need a pan, our guide to choosing a gold pan covers size and riffle style, and our gold panning supplies guide covers the rest of the gear. This guide is about the technique itself, the part most beginners never get a clear walkthrough of.
DetectorBrief is a participant in the Amazon Services LLC Associates Program, an affiliate advertising program designed to provide a means for sites to earn advertising fees by advertising and linking to Amazon.com.
Quick Links
Where to Look Before You Pan a Single Scoop
Technique only pays off if you are panning material that has gold in it. Gold is heavy, about 19 times denser than water, so moving water drops it in predictable places. Look on the inside of river bends, where the current slows as it curves. Look behind boulders, logs, and other obstructions, where the water slows and heavy particles fall out of suspension. Cracks and pockets in bedrock act like natural traps and can hold gold that has been settling there for years.
Black sand is a good sign before you even see color. It has roughly the same density as gold, so if your pan is concentrating a lot of black sand, you are working the kind of material that is also likely to hold gold. Test a few different spots with small sample pans rather than committing to one bucket of gravel, since gold distribution in a streambed can vary a lot within just a few feet.
Research Before You Dig: Finding a Stream With Real Gold History
Site selection matters more than technique. You can run a flawless pan all day and still come home with nothing if the gravel you are working never had gold in it to begin with, and a beginner with rougher technique will still find color on a genuinely productive stretch. Spend as much time researching where to go as you do learning how to pan.
State geological surveys are a good starting point. Most western states publish records of historic placer gold districts, often down to the specific creek or drainage, since this information was originally gathered for mining claims rather than recreation. A search for your state's name plus "geological survey placer gold" or "mining district map" usually turns up a public resource. Old USGS bulletins on historic mining districts cover much of the same ground and are free to read online.
Joining a local prospecting club is often the fastest route to legal, productive ground. Many clubs hold mining claims on known gold-bearing creeks and let members pan there, and members are usually glad to share advice with someone just starting out. A quick search for a prospecting club in your state or region is worth doing before you commit to a stream you found on a map with no history behind it.
What You Need
A full gear list is not the point of this guide, but a few items are worth naming since the steps below use them. You need a gold pan (ideally one with ridges called riffles that help trap fine gold), a classifier screen (a mesh sieve that filters out rocks too large to carry gold efficiently), a small magnet for black sand, and a snuffer bottle (a small squeeze bottle used to suck up visible flecks of gold). Our gold pan and gold panning supplies guides cover specific picks for each.
Step 1: Classify Your Material
Start by setting your classifier screen over the pan and scooping stream gravel from your chosen spot into the screen rather than straight into the pan. Shake and press the material through the mesh with your hands, then toss out whatever is left behind, rocks and pebbles too big to carry gold worth recovering. A 1/4 inch screen is a reasonable size for a first pass, since it clears out the bulk of oversized material without throwing away much usable sand and fine gravel.
This step matters more than most beginners expect when they're first learning how to pan for gold. Trying to pan a load full of fist sized rocks wastes most of your time moving material that was never going to hold gold, and it makes it much easier to lose a good target in the churn.
Step 2: Stratify the Pan in the Water
Submerge the pan fully and break up any clumps of clay or packed dirt by hand. Fill it no more than a quarter to half full. An overloaded pan does not separate well, no matter how good your technique is.
With the pan underwater, give it a gentle side-to-side shake, letting water move through the material while you keep the pan level. This settles the heaviest material, gold and black sand, to the bottom while lighter sand and silt rise and spread through the water. This step is sometimes called stratifying, since it sorts the load into layers by weight the same way a slow river sorts gravel over time.
Step 3: Wash Off the Lighter Material
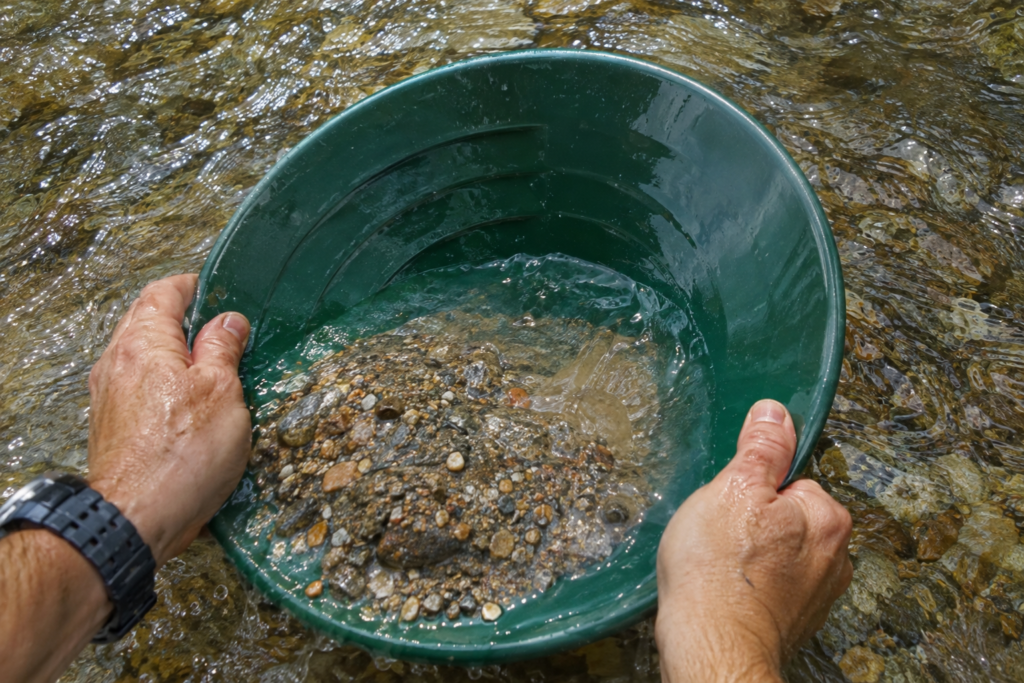
Tilt the pan slightly away from you, keeping it just under the water's surface, and let a thin layer of the lightest material wash off the far edge with each small forward-and-backward motion. Work in small amounts rather than one big sweeping motion. A fast, aggressive wash is the single most common way beginners lose gold, since it carries light and heavy material over the edge together.
Repeat the stratify and wash steps together, over and over: settle the pan underwater, then wash a little more off the top. Each round reduces what is left in the pan. After ten or twenty rounds, you should be down to a small, concentrated pile sitting in the bottom of the pan.
Step 4: Work Down to Black Sand
What is left after repeated washing is mostly black sand, made up of magnetite and other heavy minerals like garnet and hematite. Seeing a solid layer of black sand concentrating in your pan is a good sign, even before you spot any gold, since it means the pan is doing its job of sorting by weight.
Keep washing in smaller amounts from this point, draining a little water and checking the pan after each pass. Gold shows up as small, bright flecks against the dark background of the black sand, and that contrast is what makes even flour gold (gold so fine it looks like dust) visible once you are down to a small enough concentrate.
Step 5: Separate the Gold From the Black Sand
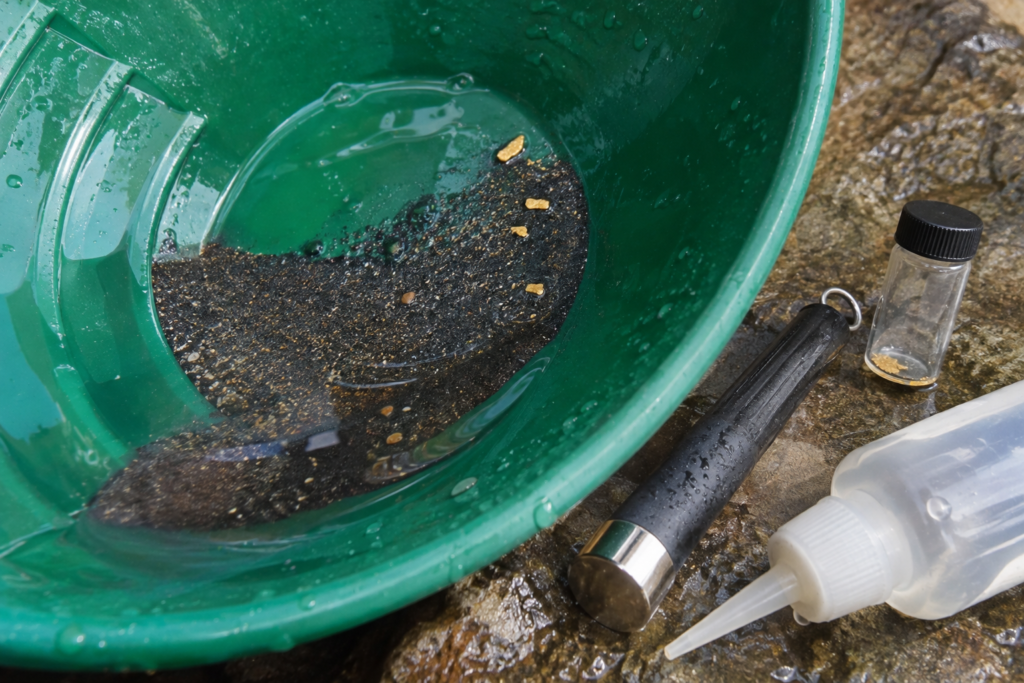
Drain off most of the water, leaving just enough to cover the black sand by about half an inch. Pick out any visible flakes or pieces directly with a snuffer bottle: squeeze the bulb, place the tip near the gold, and release it to suck the piece up.
For the remaining fine material, a small magnet wrapped in a plastic bag or held under the pan works well for pulling out magnetic black sand without touching the gold. Move the magnet in a slow, steady motion rather than plunging it into the pile, since wet black sand and fine gold can clump together and draw up with the magnet if you are not careful. If stubborn fine gold is still mixed in with the sand, drying the concentrate and passing the magnet over it again, or repanning it in a smaller container with fresh water, usually finishes the job. Transfer your gold into a small glass vial for safe storage once you are done.
Test Panning: Comparing a Few Spots Before You Commit
Before you commit a whole morning to one gravel bar, run a few quick sample pans across the features you can see: one from inside a bend, one from behind a boulder, and one from a bedrock crack if you can reach one. Carry each sample through a quick wash down to black sand and compare what you get. The spot that leaves the heaviest, darkest concentrate is telling you something real about where the stream has been dropping heavy material, gold included, and is usually the one worth spending the rest of your time on.
This matters even on a stream with a documented gold history, since most of a streambed on any given creek has little or nothing in it. The history tells you the stream is worth testing. The test pans tell you where on that stream to dig.
Common Mistakes That Lose Gold
Washing too fast is the biggest one. A hard, aggressive churn mixes gold back up into the lighter material instead of letting it settle, and it is an easy habit to fall into when you are excited to see results.
Overloading the pan is the second. A pan packed full of material cannot stratify properly no matter how carefully you wash it, so you end up working the same load for far longer than a smaller, properly loaded pan would take.
The third is skipping the black sand check. Dumping out your concentrate without a careful look, or without drying it and passing a magnet over it, is one of the easiest ways to throw away fine gold that was sitting right there in the pan.
Picking flakes out with your fingers or a pair of tweezers instead of a snuffer bottle is a fourth. Both methods lose more fine gold than people realize, since a damp fingertip or a pair of tweezers can easily flick a flake back into the pan or onto the ground instead of securing it.
The fifth is giving up after one slow trip. Low water, a crowded spot, or simple bad luck can produce a day with almost nothing even on a stream that is genuinely worth working. One quiet outing does not mean the stream, or the hobby, is a dead end.
How to Pan for Gold Legally
In the United States, casual hand panning with a gold pan, shovel, or pick is generally allowed without a permit on most land managed by the Bureau of Land Management and the US Forest Service. Federal rules define this kind of hand panning as casual use, meaning it causes little to no lasting disturbance to the land. The U.S. Forest Service's guide to gold panning on National Forest land covers the federal rules in more detail.
That does not mean every spot is open. Some areas are closed to protect wildlife or cultural sites, salmon-spawning streams in the Pacific Northwest are commonly restricted during spawning season, and land already covered by an active mining claim is off limits without the claim holder's permission. Rules also vary by state, and a few states require a separate permit for motorized equipment like suction dredges even where hand panning itself is unrestricted.
Private land always requires the owner's permission, and national parks generally prohibit any kind of prospecting, including hand panning. Designated state recreational panning areas are usually the easiest legal option for a first trip, since the land status question is already settled for you. Before you head out anywhere else, a quick check with the local BLM field office or National Forest ranger district, and a look for posted signs at the site itself, saves you from an easy mistake.
Dry Panning: What to Do Without a Stream
Some of the best known gold ground in the American West sits in dry country, parts of the Mojave and Sonoran deserts, and stretches of Nevada and Arizona, where surface water is scarce or only runs for part of the year. Dry panning is the workaround, and the basic idea is the same as wet panning: agitate the material so the heavy particles settle, then work the lighter material off the top. Air just does a weaker job of that separation than water does.
Material has to be completely dry before you start, since any dampness makes it clump together instead of separating. Spreading gravel on a tarp in direct sun for a while usually takes care of this. Classify more aggressively than you would for wet panning too, since a finer screen (1/8 inch or smaller) gives air a better chance to sort the smaller material. From there, use a circular swirl and tilt with more energy than a wet pan needs, tapping the side of the pan between swirls to help the heavy material work its way down.
Dry panning recovers less gold per load than wet panning, and most people who prospect dry ground treat it as a first pass rather than a finished process. The common approach is to dry pan in the field to reduce the bulk of the material, then bring the concentrate home and finish it with water, using the same wash and black sand steps covered earlier in this guide.
What to Expect as a Beginner
Before your first trip, set realistic expectations for how to pan for gold as a beginner. A beginner working a genuinely productive stream with reasonable technique can expect to find small flakes, not nuggets, and the total weight from a full day is often a fraction of a gram. That is normal, not a sign you are doing something wrong. The hobby rewards repeated trips and getting a feel for a specific stream far more than it rewards a single lucky outing.
Recognizing black sand early, reading a pan without washing gold out, and telling a productive feature from a barren one are all skills that come from time on the water, not from any one article. Most people notice a real improvement within their first handful of outings, and a full season of regular practice is a reasonable timeline for feeling genuinely efficient.
Keeping Track of What You Find
Once you've learned how to pan for gold, keeping good records pays off. Small glass vials keep recovered gold safe and easy to see, and labeling each one with the date and location helps you track which spots are worth a return trip. If a single pan starts turning up good color consistently, that is usually the signal to scale up with a sluice box, which processes far more material per hour than a pan ever can. Our sluice box guide covers how to pick one and set it up.
If you think you have found a nugget rather than flakes or flour gold, it is worth confirming before you get too excited. Our guide to telling if gold is real covers simple field tests you can run on the spot.
Gear for this guide4 items

Classifier screen
SE 13.25 Inch Stackable Classifier Pan, 1/8 Inch Mesh
For the first and second pass
Check Price on Amazon

Black sand magnet
SE Pocket-Sized Magnetic Separator Pen
For pulling magnetite off your gold
Check Price on Amazon
Do I need a permit to pan for gold?
Casual hand panning with a pan, shovel, or pick generally does not require a permit on BLM or US Forest Service land, but some areas are closed, private land, or active mining claims, and you always need the owner's permission. Check local rules before you start.
What is black sand, and why does it matter?
Black sand is a mix of heavy minerals, mostly magnetite, that settles in a pan alongside gold because the two share a similar density. Seeing black sand concentrate in your pan is a good sign you are working material that could also hold gold.
What size classifier screen should I use?
A 1/4 inch screen works well for a first pass, since it clears out oversized rocks without discarding much usable material. Some prospectors run a second pass through a finer screen, like 1/8 inch, once they have a smaller, more concentrated pile.
How much material should go in the pan at once?
No more than a quarter to half full. An overloaded pan cannot stratify properly, which means you lose gold no matter how careful your technique is.
Can I pan for gold in any river or stream?
Not automatically. Land status decides this. Most BLM and National Forest land allows casual hand panning, while private land, active mining claims, and national parks generally do not unless you have specific permission. Rules also vary by state.
How much gold can a beginner expect to find?
Usually a small amount, often a fraction of a gram from a full day on a genuinely productive stream. Flakes are a realistic goal for a beginner, not nuggets. Results depend heavily on which stream and which spot you work, not just on technique.
Can I pan for gold without a stream nearby?
Yes, with dry panning, which is how to pan for gold without a stream nearby. It works on the same principle as wet panning but uses air instead of water to separate material, so it recovers less gold per load. Most people dry pan in the field to reduce the bulk, then finish the concentrate with water at home.
How long does it take to get good at panning?
Most people get a feel for the motion within a handful of outings. Working efficiently, recognizing black sand early, and reading a pan without losing fine gold usually takes a full season of regular practice.